Kitchen Scissors Sharpening: Achieve Perfect Angle Consistency
By Sora Tanaka • 14th Dec
As someone who teaches steel sharpening for professionals, I'm often asked how kitchen scissors maintenance differs from using kitchen knife sharpeners. The answer lies in geometry, not grit. Scissors demand distinct angles and burr management, yet most home cooks treat them like miniature knives. This guide cuts through the noise with checkpoint-driven steps rooted in measurable feedback. Control the angle, control the outcome. Steel tells the truth.
Why can't I sharpen scissors like my chef's knife?
Kitchen knives typically use 15°-20° inclusive angles (30°-40° total), optimized for slicing. Kitchen scissors, however, require 60°-75° inclusive angles (120°-150° total). This steep bevel accommodates the scissors' dual-blade shearing motion (a physics necessity, not tradition). For the underlying mechanics of why shear geometry matters, see how edge physics creates effortless cuts. Attempting standard knife angles causes blades to slip through materials instead of cleanly cutting. I recall an apprentice who ruined expensive shears by copying his Gyuto technique; the tearing sound was his first clue something was wrong. Angle consistency for shears is non-negotiable because:
- The wider bevel absorbs shearing stress
- The opposing blade must mate perfectly during closure
- Steeper angles resist deformation when cutting tough materials (bones, thick stems)
Your feedback cue: Run a fingernail along the outside edge. If it catches inconsistently, angles have drifted.
How do I find and maintain the exact angle?
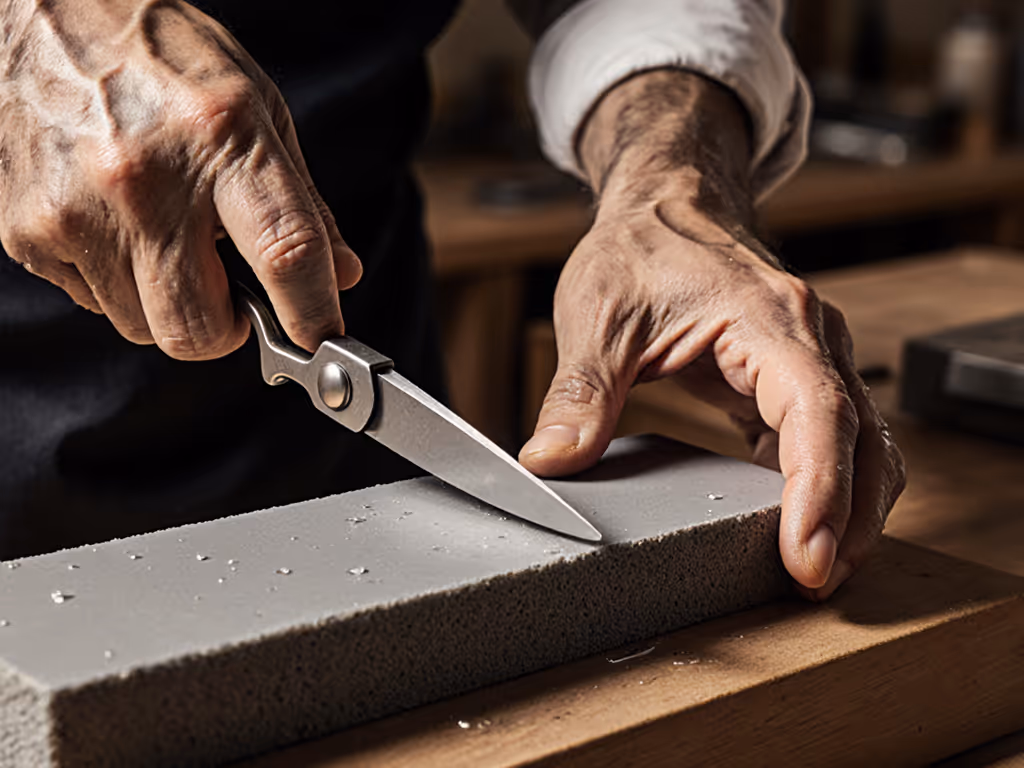
Professional shear care begins with observation. Disassemble your scissors and examine the existing bevel under light. Tilt the blade until its edge reflects light uniformly, that's your target angle. Most household shears fall between 65°-70°. To replicate this:
- Mark the bevel with a Sharpie from pivot to tip
- Place the flat inner face against your stone (coarse 400-800 grit)
- Move heel-to-tip with light, consistent pressure
- Checkpoint: Stop when ink clears entirely from the bevel
I once sharpened a $200 Wüsthof set using only a chalk line on the blade (no guides). Why? Angle consistency emerges from wrist stability, not gadgets. Your forearm should anchor against your body; your wrist becomes a hinge. After 10 strokes, test by cutting paper: ragged edges mean inconsistent angles. Repeat until cuts are clean and silent.
What if my angles drift during sharpening?
Angle drift causes the most common failure: blades that feel sharp but crush food. If this sounds familiar, work through our knife sharpening troubleshooting guide to correct uneven edges and angle inconsistencies. Two fixes exist:
- For manual sharpeners: Use a 10mm-thick rubber mat under your stone. The slight give lets your hand self-correct micro-mistakes (I learned this from a retired Kyoto sushi sharpener).
- For mechanical aids: Some find tools like the Smith's Jiffy-Pro helpful. Its floating carbide rod accommodates varying bevels while enforcing angle consistency, a valid crutch for beginners recovering from past mistakes.
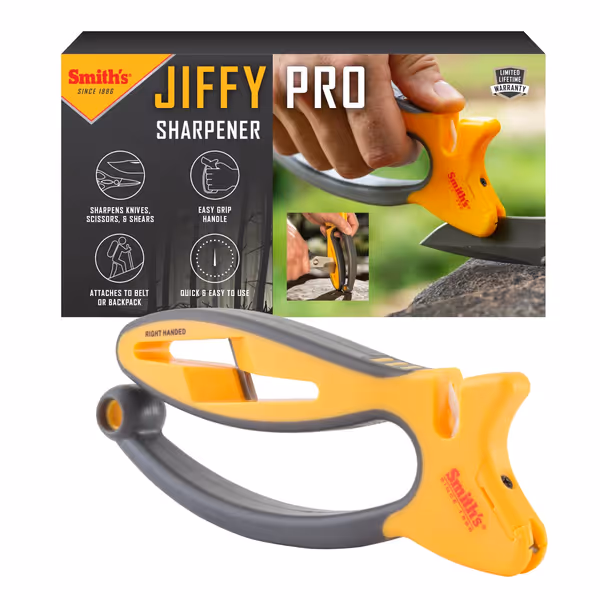
Smith's Jiffy-Pro Handheld Sharpener
Quickly sharpens knives and scissors with guaranteed, consistent angles.
$14.42
Stages2-Stage (Carbide & Ceramic)
Stages2-Stage (Carbide & Ceramic)
Pros
Sharpens dull knives and large scissors fast.
Guaranteed angle consistency for easy results.
Portable and safe for field, camp, and home use.
Cons
Durability of abrasive components is inconsistent.
Preset angle cannot be adjusted for different blade types.
Customers find the knife sharpener effective, noting it works better than other models and puts a nice edge on knives with very few strokes. They appreciate its ease of use, particularly how it handles scissors, and consider it a handy multipurpose tool that's worth the price.
Customers find the knife sharpener effective, noting it works better than other models and puts a nice edge on knives with very few strokes. They appreciate its ease of use, particularly how it handles scissors, and consider it a handy multipurpose tool that's worth the price.
Crucial note: Never force an angle. If the stone isn't contacting the full bevel width, reset your hand position. Your steel's feedback, audible scraping versus smooth shaving, tells the story.
How do I remove burrs without damaging the apex?
Kitchen scissors repair hinges on burr management. To understand burr size, formation, and clean removal, read our burr formation science explainer. Unlike knives, scissors develop two opposing burrs (one per blade). Rushing this step causes micro-chipping. Here's the pro sequence:
- Sharpen Blade A on coarse stone (10 strokes)
- Sharpen Blade B on coarse stone (10 strokes)
- Reassemble scissors and snip 10-15 times through thick paper or cardstock
- This cross-hones the blades, removing 90% of burrs
- Lighten the finishing passes on a fine stone (1,000+ grit) using only 30% of prior pressure
- Repeat snip-test until cuts feel effortless
Consistency over speed: If burrs persist after step 3, return to coarse stone with fewer strokes per side. Never strop before testing. False sharpness fools beginners.
Why does my sharpened pair still slip on tomatoes?
This signals angle inconsistency or inadequate apex refinement. High-carbon stainless shears (common in kitchens) need a micro-bevel for food release. After coarse sharpening:
- Use a 3,000+ grit stone at exactly your primary angle
- Apply feather-light pressure (15g max)
- Focus only on the final 1/3 of the blade
A telltale sign: If scissors glide through paper but snag on tomatoes, the edge lacks polish. A quick refresher on edge geometry types can help you choose the right micro-bevel and finish for push versus shear cuts. I measure success by what the blade doesn't do (no drag, no vibration, no need to force closure). Mastery lives in these nuances.
Final Thought: The Feedback Loop
Scissors sharpening reveals your skill truthfully. When angles align, steel sings. When rushed, it tears. That Saturday morning epiphany decades ago (hearing the burr's whisper change) taught me that scissors maintenance isn't about tools. It's about listening. Sharpen deliberately. Test relentlessly. Polish with respect.
Ready to refine your technique? Explore our deep-dive on steel-specific burr management for high-chromium alloys.
Related Articles